How to install an SSL certificate on Server?
IIS 8 Installation Steps:
Step1
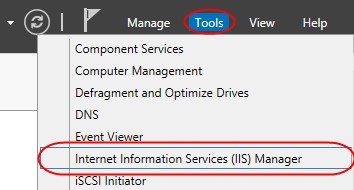
Open Server Manager and select Internet Information Services (IIS) Manager from the Tools dropdown menu.
Step2
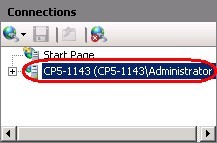
In IIS Manager, choose your server name.
Step3
Select the Server Certificates icon, located in either the IIS or Security section, based on your icon grouping.

Step4
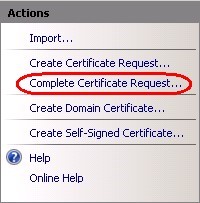
Select "Complete Certificate Request" from the Actions pane on the right.
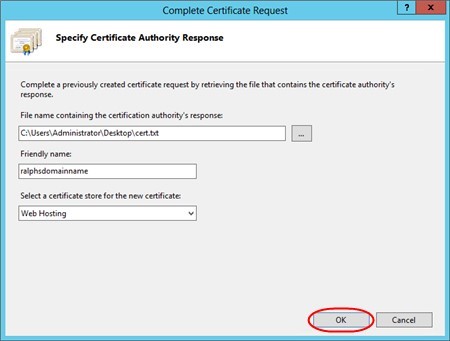
Step5
Enter the path for your new certificate, provide a friendly name, and choose a certificate store. image Step6 Click OK to finish.
Associating Your Certificate with Your Website:
Step1
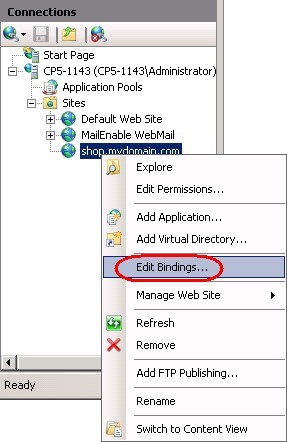
In IIS, with the left-hand Connections pane, right-click the website to add SSL to and choose Edit Bindings.
Step2 Click Edit Bindings.
Step3
Click Add in the Bindings window, select HTTPS as the binding type, choose an IP address, and select the certificate for the website.
Step4
Click OK when finished.
IIS 7 Installation Steps:
Step1Go to Start > Administrative Tools > Open Internet Information Services (IIS) Manager. Step2
In IIS Manager, select your server name.
Step3 In the Features pane, open the Server Certificates icon, found in the IIS or Security section.
Step4 Enter the path for your new certificate, provide a friendly name, and click OK.
Step5 Click OK when finished.
Associating Your Certificate with Your Website:

Step1
In IIS, with the left-hand Connections pane, right-click the website and choose Edit Bindings. Step2
Click Edit Bindings.
Click Add in the Bindings window, select HTTPS as the binding type, choose the certificate for the website, and click OK.
Step4 Click OK when finished.
Apache Installation Steps:
Step1
- Open the httpd.conf file on your server and locate the Virtual Host settings.
- Edit the directives to match your server's key components.
Step2
CentOS 1.service httpd stop. 2.service httpd start.
Ubuntu 1 2 /etc/init.d/apache2 stop /etc/init.d/apache2 start
Restart the Apache service based on your server's Linux OS.
Plesk 12 Installation Steps:
Step1 Log in to Plesk, click on Domains, and open the Control Panel for the desired domain.
Step2 Click Show More, then click Secure Your Websites and Add SSL Certificate.

Step3 Enter the certificate details and click Request.

Step4 Locate the newly created certificate, view its properties, and copy the CSR.
Step5 Submit the CSR to your certificate authority and follow their instructions for certificate acquisition.

Step6 Back in Plesk, click Browse to upload the certificate.
Step7 In Hosting Settings, enable SSL support and select the certificate from the dropdown menu.
Step8 Click OK to apply the settings.
(H2) Plesk Onyx Installation Steps:
Step1
In the Plesk control panel, choose Domains from the hosting services section.
Step2
Select the domain to add the SSL certificate to.
Step3
Click the SSL/TLS certificate icon and Add SSL/TLS Certificate.
Step4
Enter the certificate details and click Request.

Step5 Step6
Once received, click Select File to upload the certificate.
step7
In Hosting Settings, enable SSL support and choose the certificate.
Step8
Click OK to apply the settings.
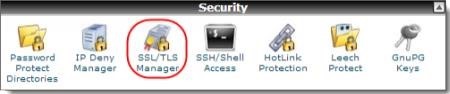
cPanel Installation Steps:
Step1
Log in to cPanel, navigate to the SSL/TLS Manager, and click Generate, View or Delete SSL Certificate Signing Requests.

Step2
Fill out the CSR form with the necessary details.
Step3
Copy the encoded CSR and submit it to your certificate authority.
Step5
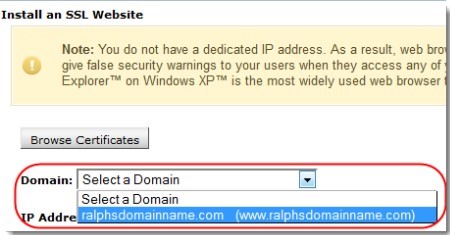
Once you receive the CRT, paste it into the cPanel SSL/TLS Manager.
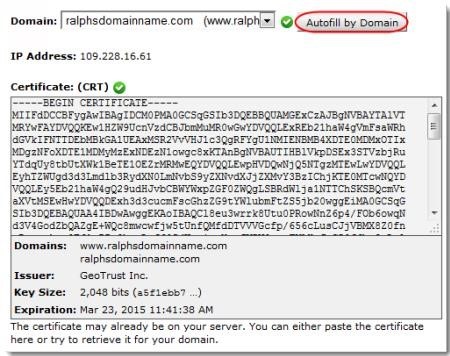

Manage SSL websites, select the domain, and install the certificate.


Comments